Review – Daler Rowney Willow Charcoal

For my foray into the medium of charcoal I wanted to try as many varieties as possible (generally how I treat every artistic venture I endeavor on) but had a limited budget. Fortunately, they sell “raw” charcoal at department stores these days, in the particular case under the Daler Rowney brand at Walmart. But how does this willow charcoal compare to some of the other charcoal products that I’ve used? Let’s take a look.

Inside the box, there are 3 bags, each containing sticks of similar size (the bags being for small, medium, and large) that are approximately six inches in length. Now, I haven’t used any other brand of willow charcoal specifically, so my comparisons here will be to the similar vine charcoal and to compressed charcoal. In that regard, it is more scratchy and harder than vine charcoal, putting down a less consistent black that isn’t quite silky smooth and which smudges to be a more pale gray. The benefit of this is that it erases fairly easily, either with a cloth or an actual eraser.

Beyond that, there isn’t much to mention about the sticks as there are many natural inconsistencies with products like this that take plant material and bake it. The sticks themselves are quite fragile, but that just requires some getting used to and many artists pre-break theirs before starting on a project (what’s left can effectively be turned into a shading dust).

So, despite being from a big-box store, this product is entirely serviceable for an inexpensive price (not that charcoal is particularly expensive in the first place). It’s easily accessible and gets the job done, even making a nice addition to the drawing kit as a lighter, more easily workable material for sketches or laying out a work. It isn’t my preferred type of charcoal, but for a beginner (and perhaps even an expert), it’ll be entirely serviceable.

Review – General’s Compressed Charcoal

As I’ve mentioned before, I haven’t significantly used charcoals in my artwork for most of my “career”, but recently stepped up and created a couple series using charcoal almost exclusively. For this I of course had to purchase most of the basic supplies for creating a charcoal drawing. As it happens, General’s produces a wide variety of inexpensive and readily available art supplies and they were the first ones I ran into when looking for compressed charcoal. I expected them to work, but not be anything spectacular. Was I right?

The set contains 4 sticks of charcoal that have been broken down and then compressed with a binder in 4 different hardnesses (2B{x2, in my pack}, 4B, and 6B). Each creates a relatively smooth and richly dark line that is very easy to smear and blend but very difficult to erase. The softer sticks do indeed create a darker and more consistent line but unsurprisingly seem to disappear in your hand while you’re using them. When compared to the “natural” vine charcoal these darker and more difficult-to-erase lines serve a different purpose: they are for further on in drawing’s development, when you are beyond the sketching stage and have most of the structure of your image created.

In my experience, these General’s sticks performed adequately. They were certainly darker and smoother than cheaper ones found in “sketching kits” that you can buy at department stores. However, they do still go down in a bit of a “chunky” pattern and aren’t true black. There is also a bit of a problem with breaking, but that’s just par for the course with this type of product. If you’re used to crayons, you’ll have to be very careful when handling these, or you can be like many artists I’ve seen and “pre-”break them in half before actually using them, which also makes it easier to get in close and work on detail areas.

These guys pretty much keep pace with a lot of General’s products. They work well, are easily available, and don’t break the bank (though they’re actually closer to the top end of the price spectrum in this case). They are a fine solution for people at all skill levels with the studio space to set up and use charcoals.

Review – INC PenMark Permanent Markers

As someone who bolts to the stationery section of every store I enter, every once in a while I just have to dive into one of the budget options there (I say that like cheap crap isn’t something that I have innumerable piles of). And if you do this at Dollar General you’re very likely to end up with something made by INC, a brand I’ve looked at before that produces writing utensils that function. Is their current foray into permanent markers, the PenMark, any good?

The bodies are a simple design. The body is a cylinder with a foil label that has minimal information printed on it. The cap mostly continues this cylindrical motif until its end, when it slants off at a slight angle. The clip is plastic and unsurprisingly molded into the cap (for safe keeping). At the other end there is a hexagonal step-down for posting, which the cap nicely clicks onto. Underneath the cap is a series of 3 step-downs that lead to a metal tube with a small, stiff felt-tip.

The performance is as to-be-expected. They smell like permanent markers, and the line stays like permanent markers. The ink causes a lot of bleeding and feathering, even on high-quality paper; the result is a line considerably thicker than the “ultra fine point” stated on the package. The colors are all pleasant and readable, with the exception of yellow, which is, like most yellow, essentially useless, and they do stick to the paper and remain vibrant once applied. Water has no discernable effect on the markings, but alcohol does start to break down the dye/pigment. The lines will break down and feather under regular rubbing alcohol, and bleed through increases tremendously, but during my tests the lines actually remained legible.

If you’re looking for an assortment of permanent marker colors on the cheap, these technically fulfill that requirement. The bodies are cheap, the nibs are brittle, the ink bleeds and is more-than-likely not archival quality. But they provide a mark that is suitably permanent on household materials (paper, tin cans, and plastic containers; they will fade, but they will leave behind a water-resistant mark) in a skinny, portable body which fits anywhere your average pen will, with a clip that holds them in place.

Review – Crayola Erasable Colored Pencils

I’ve looked at Crayola’s regular colored pencils in the past, and I’ve been known to go into far too much detail about the color and quality of what are ostensibly children’s products. In this review of Crayola’s erasable colored pencils I will be concentrating on the “gimmick” as opposed to the colors (in other words, I won’t be looking at the 24 colors from my box individually). So, do erasable colored pencils do as they say on the tin?

First, a quick note about the aesthetics, which have changed from your standard Crayola pencil. These retain their round form with the addition of a ferrule and color-coordinated eraser at one end. The name of each of the colors is printed on the barrel, but not embossed into it, and little white designs have been added to the front and back over the color-coded label. Each one also has a large uneven white patch in the middle containing a couple logos (and “f6b”, which I assume is the hardness). I think this re-design is poorly conceived, but it is a product for children, and doesn’t affect the use of the pencils.

When put to paper, the pencils feel a bit more waxy than the standard set. It’s a kind of unnatural and unpleasant feeling with the colors being a little more faded and uneven than the regular pencils. There is a little bit of blending that can happen, but it is splotchy and sometimes one simply covers another (I didn’t test with mineral spirits for blending, so I don’t know how this formulation would react). And finally, the erasability is… better than one might expect. All of the colors erase to about the same degree, which is not totally, but there is only the faintest wisp of color left on the page. It’s pretty comparable to erasing your standard graphite pencils, and it seems to work with most erasers (even gum ones, though they don’t work as well), not just the strange cheap ones that come attached to the back of the pencils.

So yeah, they work essentially as advertised. It’s not the best erasing experience but it beats not ever being able to change a mistake, and that, combined with the better blending, makes these, in my opinion, the better artist’s tool. But they’re still not comparable to higher-quality artist pencils. At school or whatnot, these work especially well as map colors (unfortunately, probably the most common use of colors in school), allowing you to fix minor mistakes. If that’s the kind of thing you’re looking for, these definitely fit the role (and they’re a couple bucks for 24, which is super cheap).

Review – Sharpie Clear View Stick Highlighter

I would imagine that somewhere within the companies that produce writing implements there is an R&D department or team, whose task it is to come up with new products that will sell and grab market attention. I would also imagine that this job is fairly difficult at this point. Not only are physical writing implements perceived as being on the way out, but those that are around have been honed for decades to be exactly what the markets are looking for. In other words, I’m not entirely sure the motivation behind “improving” highlighters with the Sharpie Clear View highlighter was actually an intention to make the product better. But maybe it does. Let’s take a look.

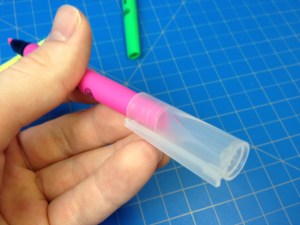
The main bodies of the pens are a matte plastic matching the color of the ink. They’re more ovular, rather then entirely cylindrical, and they taper down to the end more in one direction than the other, making their ends appear squished (or chewed on, like the ends of many pens I’ve seen). Underneath the cap is a shiny black plastic section that is slightly more slippery than the body but doesn’t really impede use. This tapers down slightly and from it protrudes a very angular, chisel-shaped felt highlighter tip. Inside this tip is a similarly shaped piece of clear plastic that both holds the tip in place and allows the user to see through it. The cap is made of a frosted plastic to allow one to see the special tip through it and the packaging, while being soft enough to not shatter easily (like many clear plastics would). It has an integrated clip and posts securely, but with a strangle wobbly feel from the “squished” rear.

The three colors that come in the package are your standard highlighter colors: pink, yellow, and green. Each is quite bright and visible, but doesn’t block whatever is being highlighted. Green is the darkest, and is a color almost unusable in some highlighters, but here it is serviceable, if my least favorite because of the “shading” pools that tend to form at the start and end of a highlighted line. Pink is slightly better at this, and of course yellow trumps both in the visibility of words beneath it, its own visibility (in good light), and lack of shading. Sharpie’s smear guard is still working as good as ever and most inks can be highlighted without trouble (but some water-based inks are more unhappy about it than others). And then there’s the main feature. After using it, I don’t get it. It is technically possible to see through the highlighter so you know what you’re highlighting and when to stop. But if you didn’t know that going in what were you thinking? And the angle you have to hold the pen at to see well isn’t a very comfortable one. I mean, I can’t fault it for “not working”, but I just don’t understand how it’s supposed to be used. It doesn’t make anything easier or better, it’s just there.

If you’re looking for a set of highlighters, these work, and if you find them at around the same price as normal highlighters (the price fluctuates) I’d say get them (it doesn’t hurt). But I wouldn’t go out of my way for them, or pay much more. I can’t see their gimmick as anything more than that, and it doesn’t work for me.